Workflow
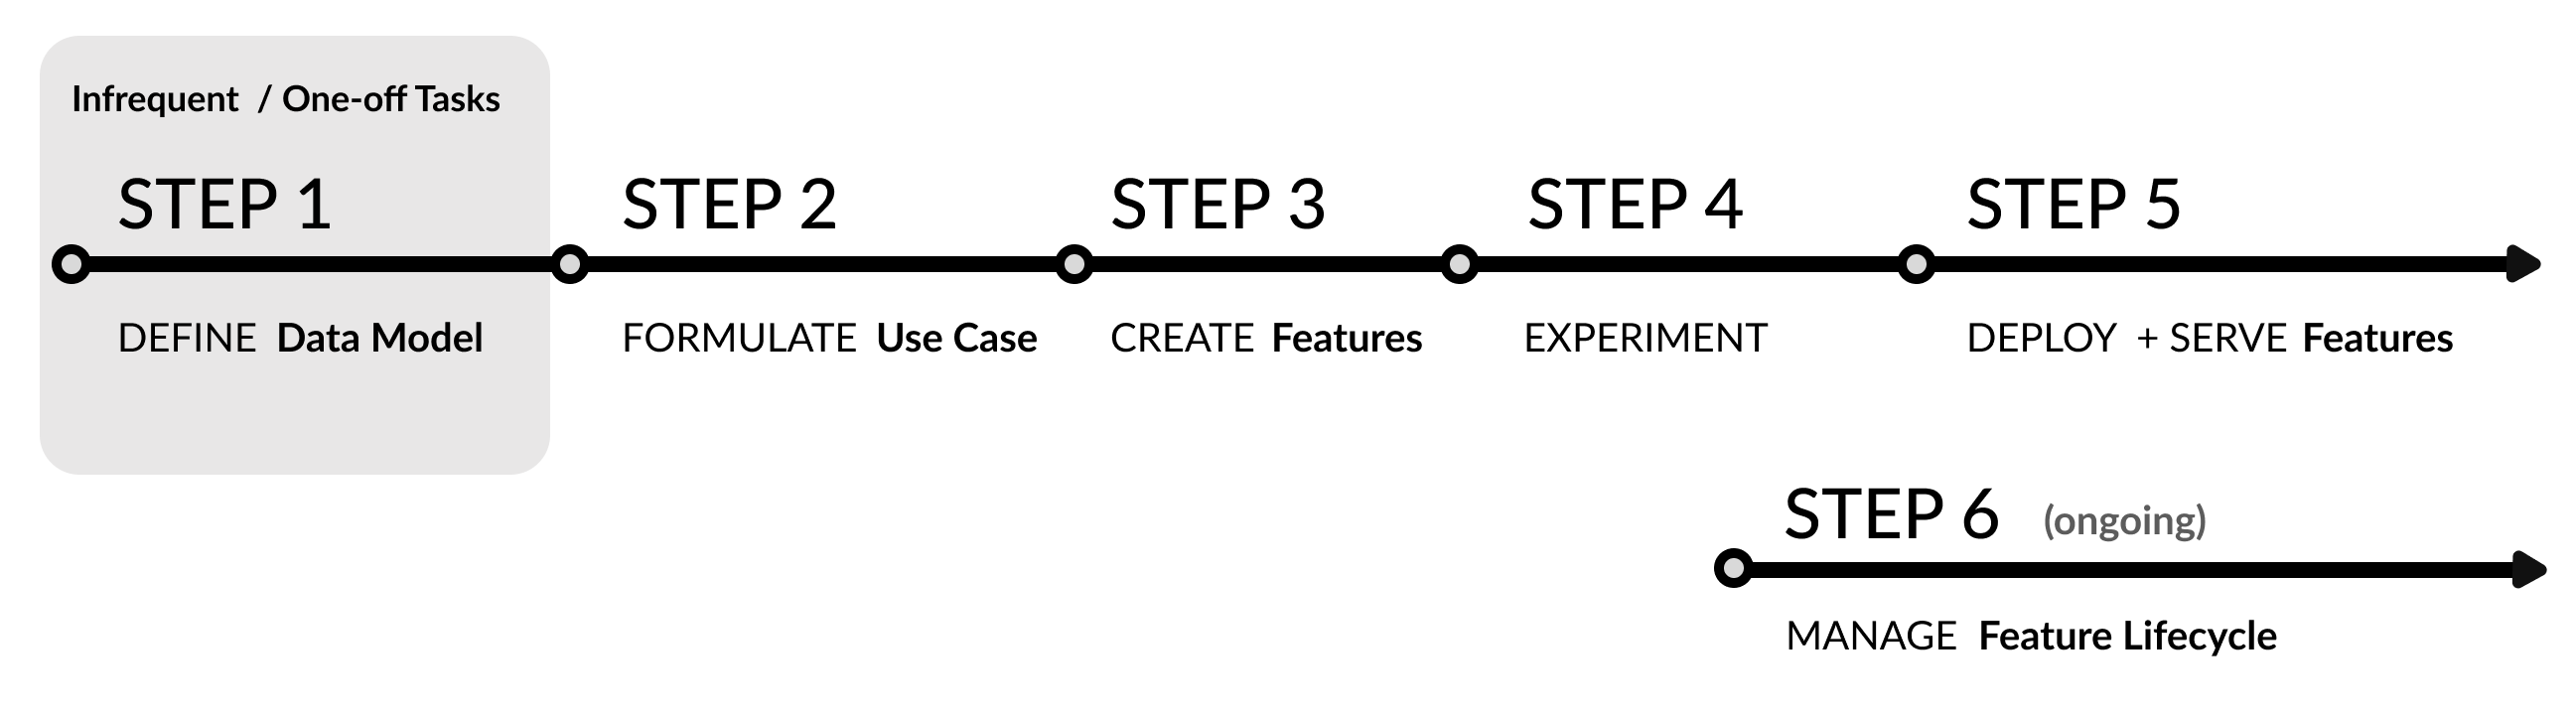
FeatureByte provides a comprehensive workflow from creating features to serving them and managing their life cycle.
The entire process can be performed using FeatureByte's Python SDK, available as a free, source available package.
For those seeking an even more intuitive experience and additional governance, FeatureByte Enterprise offers a user-friendly, no-code UI platform that unlocks a suite of advanced tools to enhance your workflow. These include:
- FeatureByte Copilot for guided discovery of features,
- a Self-Organized Catalog for streamlined feature reuse,
- and a robust, Governed Approval Flow for efficient feature management.
Continue reading to learn more about the key steps to make the most of FeatureByte SDK and FeatureByte Enterprise.
Note
For an in-depth understanding of the concepts discussed here, refer to the provided Concept links. To see these concepts in action, explore our comprehensive SDK tutorials and UI tutorials, which offer practical, step-by-step examples.
Step 1: Define Your Data Model
Setting Up a Catalog
Start by creating a catalog. This is where you'll register tables, making it easier for your team to share and find tables, entities, features and other key objects for feature serving.
If you're dealing with source tables from different domains, consider making a separate catalog for each domain to keep features organized and easily accessible.
Note
Creating a Catalog is a simple yet infrequent task.
Learn how to create a catalog with our Create Catalog SDK tutorials or Create Catalog UI tutorials.
More information is available in our SDK reference for Catalog.
Defining the Data Model in the Catalog
Once your catalog is ready, define its data model by following these steps:
- Activate the catalog for your current project.
- Identify the type of the source tables you're using. The four supported types are: event table, item table, dimension table and slowly changing dimension table.
- Register the tables into the catalog according to their types. Set up a default feature job setting for event tables, which helps maintain uniformity and consistency in feature serving.
- Identify and register entities in your data. Tag columns that relate to these entities to simplify data joins and feature associations.
- Update descriptions and Tag semantics: Understand your data's semantics for effective feature creation. Tag each data column semantically and update descriptions as needed, especially if they are absent or inadequate in your Data Warehouse. FeatureByte Copilot assists in this process for enterprise users.
- Implement default cleaning operations to ensure data quality during feature engineering.
Note
Defining your data model is crucial for effective feature engineering, though it's a task you'll do infrequently.
For step-by-step examples, see our SDK tutorials: Register tables, Register entities, Add descriptions and Set Default Cleaning Operations.
For a no-code approach, follow our UI tutorials on the same topics: Register tables, Register entities, Add descriptions and Tag Semantics, Set Default Cleaning Operations.
Explore more in our SDK reference for Source Table, Entity, Table and TableColumn.
Step 2: Formulate Your Use Case
Why Formulate a Use Case?
Creating a Use Case in FeatureByte, though optional, is highly beneficial. It helps to:
- Define the goal and practical application of your prediction model.
- Organize your training data more effectively.
- Get customized feature recommendations from FeatureByte Copilot.
- Monitor your features better after deployment.
Steps to Formulate a Use Case in FeatureByte:
-
Identify the Primary Entity: Choose the entity or combination of entities your Use Case will focus on.
-
Define the Target: Clearly state what your model aims to predict or classify. Similar to feature declaration, Target Objects can be defined using our Python SDK with the key distinction being that they employ forward operations, as opposed to the backward operations used for features.
-
Establish the Context: Describe the specific scenarios or conditions where your model will be used, such as "Active Customer in real-time scenarios."
-
Integrate Context and Target: Combine your Use Case with the chosen Context and Target to clarify its purpose and operational framework.
-
Construct Observation Sets: Build sets of data samples that match your Context and link them to their corresponding Context. These sets should include historical data related to your primary entity and can use the Target Object to fill in target values and be linked to your Use Case.
Note
For step-by-step examples, see our SDK tutorials: Formulate Use Case and Create Observation Tables.
For a no-code experience, see our UI tutorials: Formulate Use Cases and Create Observation Tables.
Further information can be found in our SDK reference for Target, Context, Use Case and ObservationTable.
Step 3: Create Features for the Use Case
FeatureByte offers two ways to create features:
- Manually: Using the SDK declarative framework
- Automatically: Using FeatureByte Copilot
Manual Feature Creation with the SDK:
To create features manually using our Python SDK, follow these steps:
-
Generate views: Create views from relevant tables in your catalog.
-
Enhance your views: Add new columns to your views, either by joining with other views or by transforming existing columns.
-
Develop features: Use your views to create features. There are three main types:
-
Transform Features: Modify existing features to create new ones.
-
Save and Share Features: Add your newly created features to the Catalog and set their readiness to public draft for sharing.
Note
Feature creation is a common task. Once a feature is created and shared, it can be reused easily.
For step-by-step examples, see our SDK tutorials on creating various types of features: Create lookup feature, Create window aggregate features, Derive from other features, Derive similarity feature from Bucketing and Use embeddings. Or make a deep dive with Explore more features
Also, check our SDK reference for View, ViewColumn and Feature.
Automated Feature Creation with FeatureByte Copilot:
To create features automatically using FeatureByte Copilot, do the following:
- Define Your Use Case: Clearly outline the Use Case you're working on to guide FeatureByte Copilot.
- Tag Columns with AI Assistance: If your columns are not semantically tagged, FeatureByte Copilot can suggest tags using Generative AI. The more detailed your data descriptions, the better the suggestions.
- Evaluate the Proposed Feature Engineering strategy: Assess FeatureByte Copilot's suggestions for data aggregation and filtering to ensure they fit your use case.
- Get Automated Feature Suggestions: FeatureByte Copilot will recommend relevant features based on your data semantics and use case. It also identifies useful existing catalog features.
- Assess Features based on their Relevance: FeatureByte Copilot automatically evaluates the features relevance to your specific use case, using Generative AI, providing scores and plain English explanations.
- Select and Add Features to the Catalog: You can add these suggested features to the Catalog directly or download notebooks to review and edit the feature code.
Note
To see FeatureByte Copilot in action, check out the Discover and Create Features with FeatureByte Copilot UI tutorial.
For more in-depth information, refer to our White Paper on FeatureByte Copilot.
User Defined Functions:
You can integrate your own transformer models for text processing or other transformations within the FeatureByte SDK. This is done by registering a User Defined Function (UDF).
-
Bring Your Own Transformer: Create a UserDefinedFunction instance. These are callable objects that can operate on any column or feature within a view, provided they have a compatible data type.
-
Utilize the UDF: Execute the UDF on either a view column or a feature. The result can either be incorporated into existing view columns or can generate a new feature.
Note
For step-by-step guidance on creating a SQL Embedding UDF, visit the Bring Your Own Transformer tutorial.
Further information can be found in our SDK reference for UserDefinedFunction
Step 4: Experiment
Experimentation Process in FeatureByte:
- Specify the Use Case you're working on.
- Build Feature Lists: Create lists of features from the catalog relevant to your use case.
- Gather Training and Test Data: Use historical feature requests based on your observation sets to obtain data for training and testing.
- Train and Test Machine Learning Models: Use the gathered data to train and evaluate your models.
- Share a Feature List: If a particular feature list shows promising results, set their status to public draft for sharing.
Enhanced Feature Search with FeatureByte Enterprise UI:
FeatureByte Enterprise UI offers advanced search capabilities for features:
- Use Case Compatibility: Shows only features that are compatible with your Use Case.
- Signal Type Categorization: Automatically categorizes features by their Signal Type, making it easier to find what you need.
- Thematic Organization: Organizes features thematically, based on their primary entity, primary table and signal type. The Feature List Builder helps compile features and suggests missing themes in your list.
Note
For step-by-step examples, refer to our SDK tutorials: Create feature list and Compute Historical Feature Values.
For a no-code experience, explore our UI tutorials: Create Feature List and Compute historical feature values.
Also, check our SDK reference for FeatureList, and HistoricalFeatureTable.
Step 5: Deploy and Serve a Feature List
Deployment and Serving Process:
- Prepare Features for Production: Mark the features in your list as production-ready.
- Deploy the Feature List: Associate it with a specific Use Case to monitor your features better after deployment.
- Enable deployment: Activate the deployment to automatically handle the pre-computation of feature values. These values are stored in an online feature store for both online and batch serving.
- Retrieve Feature Values: Use the REST API service for online serving, retrieving and transforming feature values from the online store, or the SDK to get a batch of feature values for batch serving.
Important Note for FeatureByte Enterprise Users
In Catalogs with Approval Flow enabled, moving features to production-ready status involves a comprehensive approval process.
This includes several evaluations, such as checking the feature's compliance with default cleaning operations and the feature job setting of its source tables. It also involves confirming the status of these tables and backtesting the feature job setting to prevent future training-serving inconsistencies. Additionally, essential details of the feature, particularly its feature definition file, are shared and subjected to a thorough review.
Note
For detailed instructions, see our Deploy and Serve Feature List SDK tutorial. For a no-code experience and a guided approval process, explore our UI tutorial.
More information is available in our SDK reference for Deployment, BatchRequestTable and BatchFeatureTable.
Step 6: Manage the Life Cycle of Your Feature
Maintaining your feature's life cycle effectively is crucial to ensure data integrity and model accuracy in production.
Update Feature Job Settings and Cleaning Operations
When data changes occur, follow these steps:
- Revise Job Setting or Cleaning Operations: For tables where data availability or quality changed, update their feature job setting or cleaning operations. This ensures new features are configured correctly.
- Create New Versions of Features: When necessary, produce new feature versions reflecting the latest feature job setting or cleaning operations. Update their readiness to set them as the default.
- Refresh Feature Lists: Incorporate the newest default versions of features in your feature lists.
Important Note for FeatureByte Enterprise Users
In Catalogs with Approval Flow enabled, changes in table metadata initiate a review process. This process recommends new versions of features and lists linked to these tables, ensuring that new models and deployments use versions that address any data issues.
Manage Online and Batch Serving
- Adjust Deployments as Needed: If online and batch serving are no longer needed, you can disable them without affecting historical request serving.
Monitor Feature Job Status
-
Stay Informed with Job Reports: Regularly review feature job status reports to track the performance of your deployed features.
-
Address Capacity Issues: If you encounter compute capacity issues, consider increasing the size of your instances.
Note
For detailed instructions, see our Manage Feature Life Cycle SDK tutorial. For a no-code experience and a guided approval process, explore our UI tutorial.